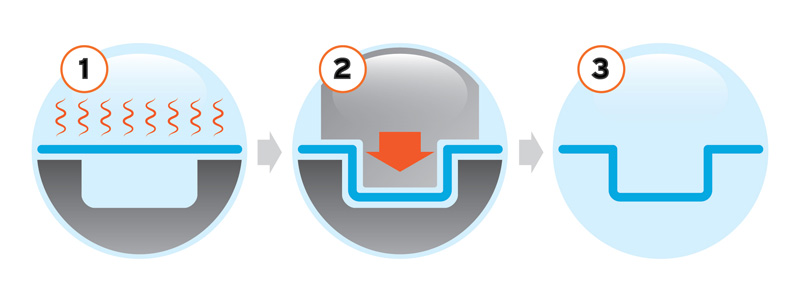
Thermoforming is a manufacturing process where a plastic sheet is heated to a pliable forming temperature, shaped into a specific form using a mold, and trimmed to create a usable product. The mold used in this process is known as a thermoforming mold. This article delves into the intricacies of thermoforming molds, their types, applications, and the materials used in their construction, providing a comprehensive understanding suitable for both industry professionals and those seeking detailed knowledge on the subject.
Types of Thermoforming Molds
Thermoforming molds can be broadly classified into two categories: male (positive) molds and female (negative) molds.
Male Molds
Male molds, also known as plug assists, have a raised shape that the heated plastic sheet is draped over. This type of mold is beneficial when detailed surface textures are needed on the inside of the formed product. Male molds are commonly used in applications where uniform wall thickness is critical.
Female Molds
Female molds, also known as cavity molds, have a recessed shape into which the heated plastic sheet is pressed. This mold type is suitable for creating products where a detailed surface texture is required on the exterior of the product. Female molds are often used for items like trays, lids, and packaging containers.
Materials Used in Thermoforming Molds
The choice of material for constructing thermoforming molds depends on several factors, including the complexity of the mold design, the required durability, and the production volume. Common materials include:
Aluminum
Aluminum is a popular choice for thermoforming molds due to its excellent thermal conductivity, lightweight, and ease of machining. It is ideal for high-precision molds and applications requiring detailed surface textures. Aluminum molds are durable and can withstand repeated heating and cooling cycles, making them suitable for high-volume production.
Epoxy Resins
Epoxy resins are often used for creating prototype molds or low-volume production runs. These molds are cost-effective and can be quickly fabricated, making them ideal for testing and development purposes. However, they may not be as durable as metal molds and are typically used for shorter production cycles.
Composite Materials
Composite materials, such as fiberglass, offer a good balance between durability and cost. These molds are suitable for medium-volume production runs and can provide detailed surface textures. Composites are also lightweight and have good thermal properties, making them an attractive option for many thermoforming applications.

Design Considerations for Thermoforming Molds
Designing an effective thermoforming mold requires careful consideration of several factors to ensure optimal performance and product quality.
Draft Angles
Incorporating draft angles into the mold design is crucial for easy removal of the formed part. A draft angle is a slight taper in the mold walls that allows the plastic part to be easily released without damaging the product or the mold.
Venting
Proper venting is essential to prevent air traps during the forming process. Small holes are strategically placed in the mold to allow air to escape, ensuring that the plastic sheet conforms accurately to the mold surface. Inadequate venting can lead to defects such as bubbles or incomplete forming.
Surface Finish
The surface finish of the mold directly impacts the final appearance of the thermoformed product. Molds can be polished to achieve a smooth, glossy finish or textured to create specific surface patterns. The choice of surface finish depends on the desired aesthetic and functional properties of the final product.
Applications of Thermoforming Molds
Thermoforming molds are used in a wide range of industries to produce various products. Some common applications include:
Packaging
Thermoforming molds are extensively used in the packaging industry to create trays, blisters, clamshells, and other packaging solutions. These molds allow for the production of customized packaging that securely holds and protects products during transportation and display.
Automotive
In the automotive industry, thermoforming molds are used to produce interior components, such as dashboard panels, door liners, and seat covers. The ability to create complex shapes and detailed textures makes thermoforming an ideal process for automotive applications.
Medical
Thermoforming molds are used to manufacture medical devices and components, such as trays, enclosures, and packaging for sterile products. The process ensures high precision and cleanliness, which are critical in the medical field.
Consumer Products
Thermoforming molds are also employed in the production of various consumer goods, including toys, appliances, and electronic housings. The versatility of the thermoforming process allows for the creation of diverse and intricate designs.
Conclusion
Thermoforming molds play a crucial role in the thermoforming process, enabling the production of a wide range of products with varying shapes and sizes. Understanding the types of molds, materials used, design considerations, and applications is essential for optimizing the thermoforming process and achieving high-quality results. Whether for packaging, automotive, medical, or consumer products, thermoforming molds offer a versatile and efficient solution for manufacturing durable and detailed plastic components.


